

How to Draw and Identify a Tap Root System Easily
The concept of tap root diagram is essential in biology and helps explain real-world biological processes and exam-level questions effectively.
Understanding Tap Root Diagram
Tap root diagram refers to a drawing that displays the structure of the tap root system, which is a type of plant root system with one main, vertical primary root and multiple smaller lateral roots. This concept is important in areas like root system diagram study, root anatomy, and comparing the difference between tap root and fibrous root in plants.
Main Parts in a Labeled Tap Root Diagram
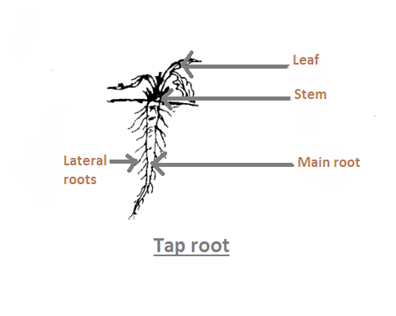
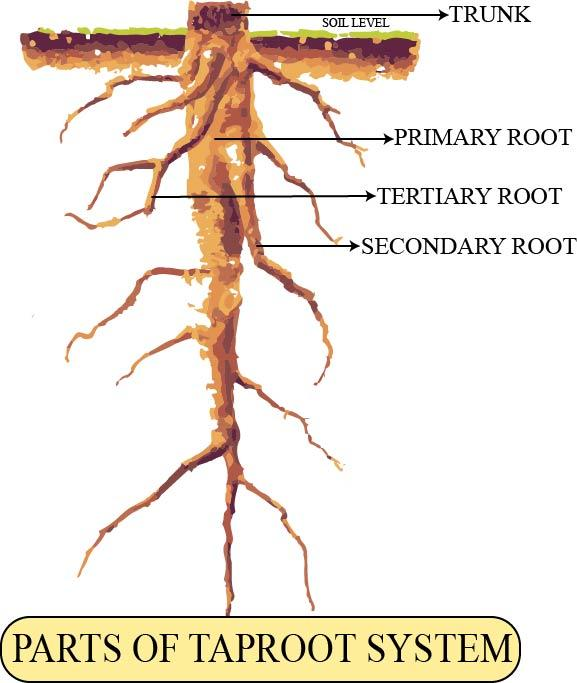
A typical tap root diagram includes these main parts:
- Primary Root – the main vertical root emerging from the plant embryo
- Lateral Roots (Secondary and Tertiary) – smaller roots branching off from the primary root
- Root Cap – protective tip covering the end of the primary root
- Root Hairs – tiny structures that absorb water and nutrients from the soil
- Regions of Division, Elongation, and Differentiation – marked zones along the primary root
How to Draw a Tap Root Diagram – Step by Step
Follow these steps to draw a neat, labeled tap root diagram suitable for board and school exams:
- Draw a straight, vertical line to represent the primary root.
- From the sides of this line, sketch out smaller branches for lateral roots (secondary and tertiary roots).
- At the tip of the root, add a rounded shape for the root cap.
- Add fine lines near the root tip to show root hairs.
- Label each part: primary root, lateral roots, root cap, root hairs.
- Keep your diagram simple, clean, and accurate for scoring full marks.
Tap Root Functions and Examples
- Anchorage: Tap roots anchor the plant deeply in the soil.
- Water and Nutrient Absorption: Tap roots absorb water and minerals, even from deep soil layers.
- Storage: Many tap roots (like carrot, turnip, beetroot) act as storage organs for food.
- Examples of Plants with Tap Root Systems: Carrot, radish, dandelion, mustard, gram, mango, and pea.
Types of Tap Roots in Plants
Tap roots also differ in shape. Common types are:
- Conical – thick at the top, narrowing down (e.g., carrot)
- Napiform – spherical and suddenly tapering (e.g., turnip)
- Fusiform – spindle-shaped, broad in the middle (e.g., radish)
- Tuberous – irregular, for food storage (e.g., beetroot)
Tap Root Diagram vs Fibrous Root Diagram
It is important to know how a tap root diagram is different from a fibrous root diagram for exams:
| Feature | Tap Root Diagram | Fibrous Root Diagram |
|---|---|---|
| Main Root | Single, prominent primary root | Many roots of equal size |
| Secondary Roots | Present, branch from main root | Absent or very fine |
| Plant Type | Seen in dicots (carrot, mango) | Seen in monocots (wheat, grass) |
Common Mistakes to Avoid
- Confusing tap root diagram with fibrous root diagrams in labeling and exam answers.
- Forgetting to label main structures (primary root, root cap, lateral roots).
- Adding too many or too few lateral roots—keep it simple and proportionate.
Real-World Applications
The concept of tap root diagram is used in agriculture for crop selection, plant breeding for drought resistance, and soil conservation. Vedantu helps students relate such topics to practical examples in daily life, especially during field visits or science fairs.
Practice Questions
- Draw and label a neat tap root diagram.
- List three differences between tap root and fibrous root systems using diagrams.
- Give two examples of plants with conical tap roots and napiform tap roots.
- How does the tap root help in water absorption compared to fibrous roots?
In this article, we explored tap root diagram, its key processes, real-life significance, and how to solve questions based on it. To learn more and build confidence, keep practicing with Vedantu.
For a broader understanding of plant roots and related biology topics, explore these helpful resources:
- Types of Roots in Plants – learn all root systems with diagrams.
- Difference Between Monocot and Dicot Root – understand why tap roots belong to dicots.
- Modification of Root – see how roots adapt for storage and support.
- Parts of a Plant – connect roots with other plant parts and functions.
- Nutrition in Plants – discover how tap roots support plant nutrition.
- Plant Cell Structure and Function – relate roots to cell biology basics.
- Fibrous Root Diagram – compare directly with another root system.
- Dicotyledonous and Monocotyledonous Seeds – advance your knowledge about dicots and monocots.
- Getting to Know Plants – perfect for quick plant basics and revision before drawing diagrams.
- Diagram of Heart – practice labeling diagrams in biology for board exams.
- Amoeba Diagram – improve your diagram drawing strategy using multiple examples.


FAQs on Tap Root Diagram: Complete Structure and Labeled Drawing
1. What is a tap root diagram?
A tap root diagram visually represents the root system of dicot plants, showing a main, vertical primary root from which smaller lateral roots arise. It helps students understand the structure and parts of the taproot for exams and practical learning.
2. How do you draw a tap root diagram for class 6 or 11?
To draw a tap root diagram for classes 6 or 11, follow these steps:
1. Draw a thick, central vertical line representing the primary root.
2. Add several smaller lines branching out for the lateral roots.
3. Label parts such as the root cap, primary root, and lateral roots.
4. Keep the drawing clear and simple to match board exam requirements.
3. Which plants have tap root systems?
Many dicotyledonous plants have a tap root system, including common examples like carrot, radish, turnip, and dandelion. These roots grow vertically deep into the soil with smaller side roots emerging.
4. How to identify a tap root in a diagram?
A tap root can be identified in a diagram by the presence of a single, thick, and long primary root running vertically downward with thinner lateral roots branching out. It usually has a root cap at the tip and is more prominent than fibrous roots.
5. What is the difference between tap root and fibrous root diagrams?
The main differences are:
- Tap root diagram shows one main primary root with smaller lateral roots branching from it.
- Fibrous root diagram shows many thin roots of roughly the same size spread out in all directions.
Tap roots are typical in dicots, while fibrous roots occur in monocots.
6. What mistakes do students make while labeling tap root diagrams in board exams?
Common mistakes include:
• Mislabeling lateral roots as primary roots.
• Missing labels like root cap or root hairs.
• Drawing fibrous roots instead of a single main root.
• Confusing tap root with adventitious roots.
Accurate labeling and clear, neat diagrams help avoid these errors.
7. Why are tap root diagrams used mainly for dicot plants?
Tap root systems are characteristic of dicot plants because they develop from the radicle of the embryo and grow into a main vertical root. Monocots, in contrast, generally have a fibrous root system. Thus, tap root diagrams mainly represent dicots in biology syllabi.
8. How does the function of tap root differ from fibrous root in water absorption?
The tap root penetrates deep into the soil, allowing plants to absorb water from deeper layers, which is useful in dry conditions. Fibrous roots form a dense network near the soil surface, absorbing water quickly but mainly from upper soil layers.
9. Why do NCERT textbooks stress step-by-step diagram drawing?
NCERT emphasizes step-by-step drawing to help students break down complex diagrams into manageable parts, improving accuracy, retention, and exam performance. It trains students in structured drawing, leading to clearer and more precise diagrams for board exams.
10. Can tap root diagrams help in identifying soil health in practicals?
While tap root diagrams primarily illustrate root structure, observing actual tap roots in practicals can provide clues about soil health, such as root growth depth and root hair presence indicating nutrient and water availability. However, soil health assessment requires additional tests beyond diagrams.


